

How to setup a 3.5mm headset with Windows 10
1. Plug the headset into a combination headset port.
Make sure the plug is completely plugged into the headset port, and no silver is showing.
Note: a headset port is different from an audio out port, and some computers have a separate port for the microphone. For this type of computer, a Y headset splitter adapter is required.
2. Double check the headset mute button. (If the headset has a mute button.)
If the 3.5mm headset has a mute button on its inline controls, please double-check that the mute is not turned on if your 3.5mm headset doesn’t have that feature, no worries.
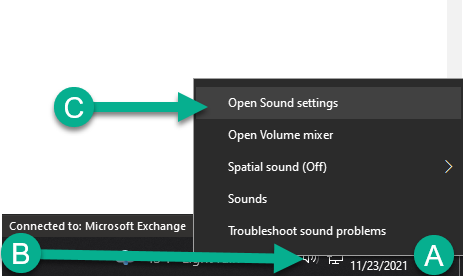
3. Open Sound Settings.
A. Locate the speaker icon in the right-hand corner of the screen by the time and date.
B. Right Click the speaker icon.
C. Hover the mouse above sound settings & left-click sound settings.
4. Set Realtek audio as the output device.
Next go here to “Output” and under “choose your output device” left click the down carrot and select the Realtek option. Realtek is the generic audio driver provided by the manufacturer.
Double check that the master volume is on and check for sound.

5. Set the Realtek microphone as the input device.
Next, go to “Input,” and under “choose your input device,” left-click the down carrot and select the Realtek option.
Now here it says, “Test your microphone,” let's speak into the microphone. If the microphone is working, this blue bar should be reactive.
Go to device properties, and let’s set the microphone input volume down to somewhere in the range of 65 and 85. This way, we aren’t too loud for our next virtual meeting.

Summary & Trouble Shooting
Now your 3.5mm headset is set up on Windows 10. Thank you for taking the time to set up your headset with us, and have a great day! If you are still having trouble with the headset, please reach out to us using the contact form below.